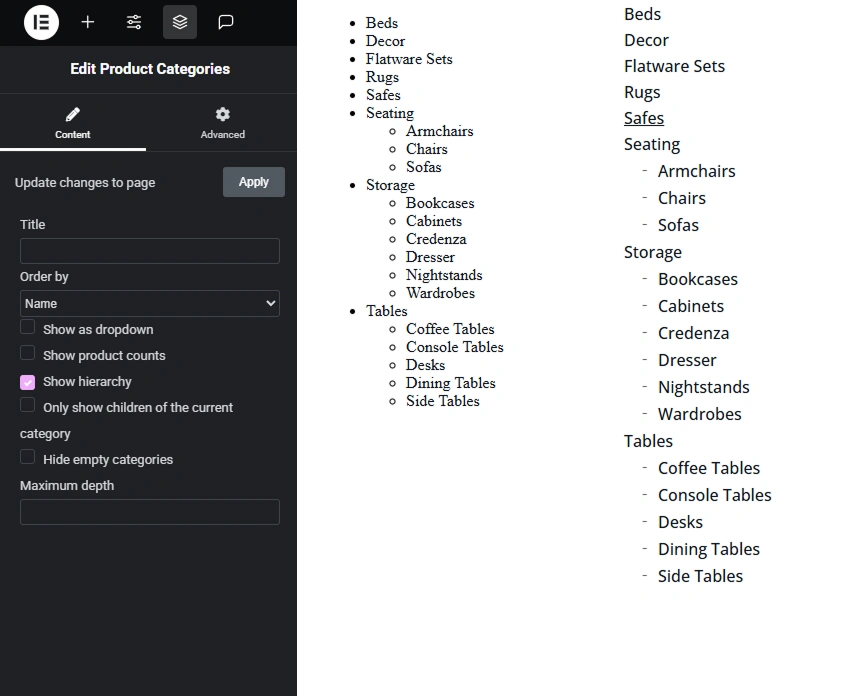
The Product Categories widget in Elementor is a tool for displaying product categories in a WooCommerce-based online store. However, its default appearance may be too plain and not always align with your website’s design. In this article, we’ll explore how to style the Product Categories widget to make it look modern, clean, and highlight the active category with an underline. We’ll also optimize the display of subcategories and add visual enhancements for a better user experience.
Step 1: Basic Structure and Style Reset
First, let’s remove default list markers and adjust margins to ensure categories look neat. This creates a clean foundation for further styling.
.woocommerce .product-categories {
    padding-left: 0;
    margin-left: 0;
    margin-top: 0;
}

.woocommerce .product-categories > li {
    list-style: none;
    margin-bottom: 4px;
}
- padding-left: 0 and margin-left: 0 remove unnecessary padding from the main category list.
- list-style: none eliminates list markers.
- margin-bottom: 4px adds a small gap between categories for better readability.
Step 2: Styling Category Links
Next, let’s style the links for main categories and subcategories. We’ll use the “Open Sans” font for consistency and set basic text properties.
.woocommerce .product-categories > li > a {
    font-family: "Open Sans", Sans-serif;
    font-size: 16px;
    font-weight: 500;
    color: #0D141A;
    text-decoration: none;
    transition: all 0.3s ease;
}

.woocommerce .product-categories > li > a:hover {
    color: #0D141A;
    opacity: 0.8;
}
- font-family: “Open Sans”, Sans-serif sets a modern, readable font.
- font-size: 16px and font-weight: 500 ensure optimal readability.
- text-decoration: none removes the default underline.
- transition: all 0.3s ease adds smooth style changes on hover.
- opacity: 0.8 on :hover creates a subtle hover effect while maintaining text color.
Step 3: Styling Subcategories
Subcategories should visually differ from main categories to emphasize hierarchy. We’ll add a small indent and a dash symbol before subcategory names.
.woocommerce .product-categories .children li {
    list-style: none;
    position: relative;
    padding-left: 1em;
    margin-bottom: 5px;
    margin-top: 5px;
}

.woocommerce .product-categories .children li::before {
    content: "-";
    position: absolute;
    left: 0;
    color: #666;
    font-weight: normal;
}

.woocommerce .product-categories .children li a {
    font-family: "Open Sans", Sans-serif;
    font-size: 16px;
    font-weight: 500;
    color: #0D141A;
    text-decoration: none;
    transition: all 0.3s ease;
}

.woocommerce .product-categories .children li a:hover {
    opacity: 0.8;
}
- padding-left: 1em creates an indent for subcategories to visually separate them.
- content: “-“; adds a dash before subcategories to indicate hierarchy.
- color: #666 for the dash makes it less prominent, avoiding distraction from the text.
- margin-bottom: 5px; margin-top: 5px set consistent spacing between subcategories.
Step 4: Underlining the Active Category
To highlight the current (active) category, we’ll add an underline using the current-cat class, which WooCommerce applies automatically.
.widget_product_categories .product-categories .current-cat > a {
    text-decoration: underline;
    text-decoration-color: #0D141A;
    text-decoration-thickness: 2px;
}
- text-decoration: underline adds an underline to the active category.
- text-decoration-color: #0D141A sets the underline color to match the text.
- text-decoration-thickness: 2px makes the underline noticeable but not overly bold.
Step 5: Adjusting Subcategory Margins
Sometimes, subcategories may shift due to layout quirks. To correct their positioning, we’ll add a negative margin:
.children {
    margin-left: -22px;
}
- margin-left: -22px aligns subcategories with the main list, compensating for potential offsets in the layout.
Final CSS Code
Here’s the complete CSS code for styling the Product Categories widget:
.woocommerce .product-categories {
    padding-left: 0;
    margin-left: 0;
    margin-top: 0;
}

.woocommerce .product-categories > li {
    list-style: none;
    margin-bottom: 4px;
}

.woocommerce .product-categories > li > a {
    font-family: "Open Sans", Sans-serif;
    font-size: 16px;
    font-weight: 500;
    color: #0D141A;
    text-decoration: none;
    transition: all 0.3s ease;
}

.woocommerce .product-categories > li > a:hover {
    color: #0D141A;
    opacity: 0.8;
}

.woocommerce .product-categories .children li {
    list-style: none;
    position: relative;
    padding-left: 1em;
    margin-bottom: 5px;
    margin-top: 5px;
}

.woocommerce .product-categories .children li::before {
    content: "-";
    position: absolute;
    left: 0;
    color: #666;
    font-weight: normal;
}

.woocommerce .product-categories .children li a {
    font-family: "Open Sans", Sans-serif;
    font-size: 16px;
    font-weight: 500;
    color: #0D141A;
    text-decoration: none;
    transition: all 0.3s ease;
}

.woocommerce .product-categories .children li a:hover {
    opacity: 0.8;
}

.children {
    margin-left: -22px;
}

.widget_product_categories .product-categories .current-cat > a {
    text-decoration: underline;
    text-decoration-color: #0D141A;
    text-decoration-thickness: 2px;
}
How to Add Styles to Your Site
- Via Elementor Panel: If you’re using custom styles in Elementor, add the CSS in the Custom CSS section of the widget or page settings.
- Via Theme Stylesheet: Insert the code into the
style.cssfile of your theme or child theme. - Via Plugin: Use a plugin like Custom Functions Plugin or Code Snippets to add the CSS to the
<style>section.
Additional Tips
- Responsiveness: Check how the widget looks on mobile devices. If needed, add media queries, for example:
@media (max-width: 768px) {
    .woocommerce .product-categories > li > a {
        font-size: 14px;
    }
    .woocommerce .product-categories .children li a {
        font-size: 14px;
    }
}
- Color Scheme: If your site uses a different palette, replace
#0D141Aand#666with colors that match your design. - Testing: Verify the display across different browsers to ensure styles are applied correctly.
With the provided CSS code, you can transform the standard Elementor Product Categories widget into a stylish and user-friendly component. Underlining the active category and neatly formatting subcategories will enhance navigation and the visual appeal of your online store. Experiment with colors and spacing to perfectly integrate the widget into your site’s design!